
The short answer is yes, updating WordPress is critical for maintaining the security, stability, and performance of your website. WordPress, being one of the most widely used web platforms globally (over 40% of all sites are WordPress).
Being one of the most popular platforms means WordPress is a prime target for hackers and cyber attacks. Staying up-to-date with the latest version of WordPress is crucial to defend against potential security threats.
But updating can come with conflicts and errors. We’ll cover why to update but also how to update without causing any issues.
Securing Your WordPress Site
Updating WordPress is crucial to mitigate the risk of security breaches, protect against evolving cyber threats, maintain regulatory compliance, and safeguard your website and sensitive data from unauthorised access and malicious activities.
Patch Vulnerabilities
Each WordPress update typically includes patches for known security vulnerabilities. Hackers actively scan the internet for websites running outdated versions of WordPress, as these versions often contain exploitable vulnerabilities.
By quickly applying updates, you close these security loopholes and mitigate the risk of unauthorised access, data breaches, and other malicious activities.
Enhance Security Features
In addition to patching vulnerabilities, WordPress updates often introduce new security features, enhancements, and best practices to strengthen the overall security posture of the platform.
These may include improved encryption algorithms, enhanced authentication mechanisms, or security-focused code optimizations, all of which contribute to a more robust and resilient security framework for your website.
Compliance Requirements
In many industries, compliance regulations mandate regular security updates and patches to protect sensitive data and ensure the confidentiality, integrity, and availability of information systems.
Failure to keep WordPress updated may result in non-compliance with regulatory standards, exposing your business to potential legal liabilities, fines, and reputational damage.
How to Update Your WordPress Site
1. Login in to WP Dashboard: The first thing you need to do is sign into your WordPress dashboard and navigate to
3. Clear Cache: In the WP Fastest Cache settings, click on the “Delete Cache” tab. Here, you’ll find options to clear the cache.
4. Choose Cache Deletion Option: Select either “Delete Cache” to remove cached files only, or “Delete Cache & JS” for a more thorough cleanup, which also clears JavaScript files cached by the plugin.
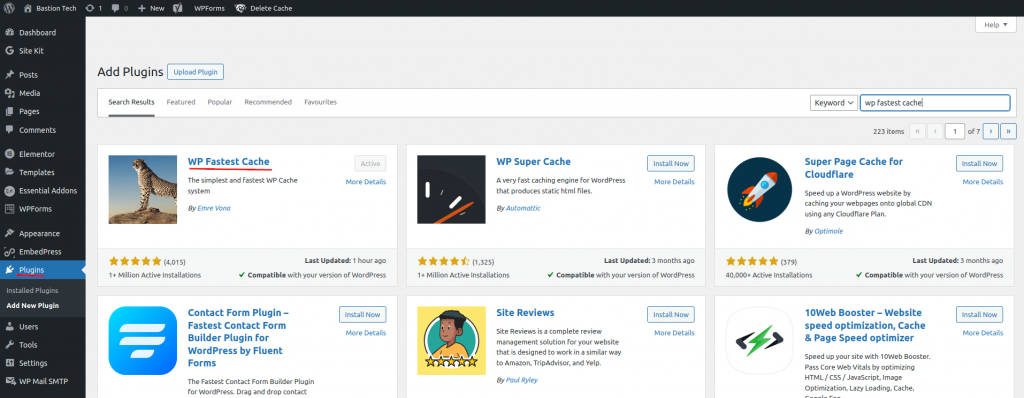
2. Access Plugin Settings: After activation, locate WP Fastest Cache in your WordPress admin dashboard menu. Click on it to access the plugin settings.
3. Clear Cache: In the WP Fastest Cache settings, click on the “Delete Cache” tab. Here, you’ll find options to clear the cache.
4. Choose Cache Deletion Option: Select either “Delete Cache” to remove cached files only, or “Delete Cache & JS” for a more thorough cleanup, which also clears JavaScript files cached by the plugin.
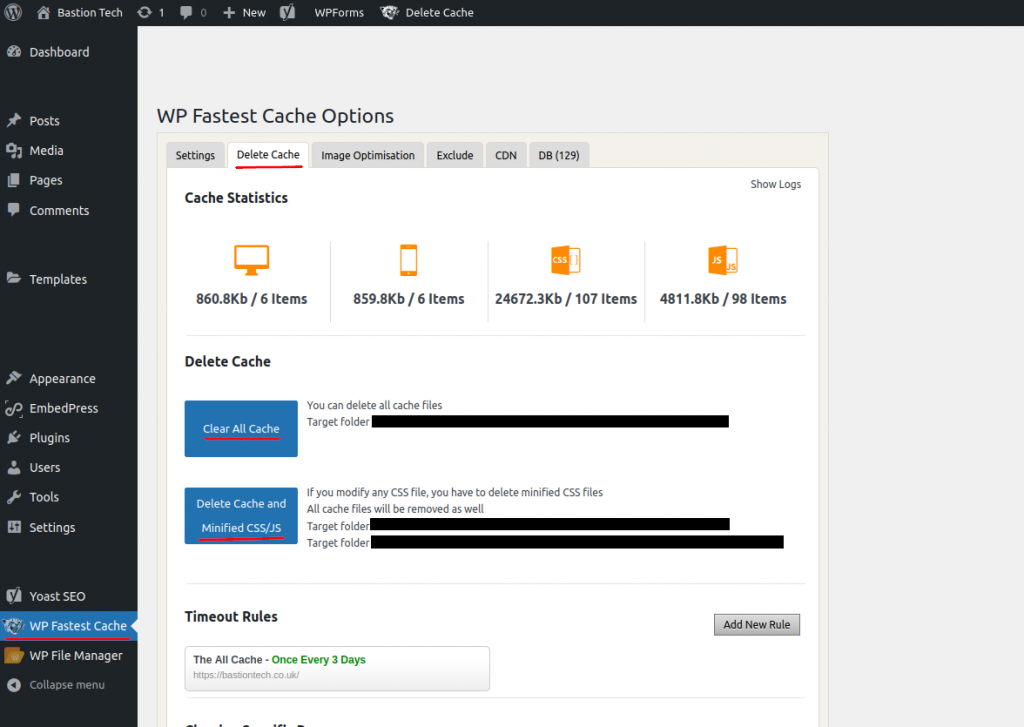
5. That’s it! All the cache is cleared. Go back into the “settings tab” to optimise your caching settings
Fixing WordPress Plugin Issues
How to check for wordpress plugin conflicts?
When your WordPress site suddenly has issues, plugins can often be the silent troublemakers. Here’s how to find which plugin is the culprit.
Recent Plugin Activity:
Think about recent plugin installations or updates. If you’ve recently added or updated a plugin, it could be the source of the issue. Temporarily deactivate this plugin to see if the problem resolves.
Plugin Deactivation or Debugging:
If the issue persists after deactivating any recent plugins, it’s time for some troubleshooting. Deactivating plugins one by one, testing the site’s display after each deactivation can help you find which one is the culprit but can also cause other issues..
For those comfortable with the more tech savvy approach, enable WP_DEBUG mode in your WordPress configuration then check the error logs.
Enabling WP Debug
Add the following lines to your wp-config.php file:
					// Enable WP_DEBUG mode
define( 'WP_DEBUG', true );

// Enable Debug logging to the /wp-content/debug.log file
define( 'WP_DEBUG_LOG', true );
Enabling debug mode logs errors and warnings to a debug.log file in your /wp-content/ directory. Reviewing these logs can provide insights into underlying issues causing display problems.
WordPress Page Builders Issues
When your WordPress site’s visuals start acting up, don’t overlook the tools that you used to build it. Page builder plugins like WP Page Builder, Elementor, or WPBakery are useful tools, but they can sometimes be a thorn among the roses.
Reset CSS:
Begin by resetting the CSS of your page builder plugin. This action can help iron out any wrinkles caused by conflicting styles. Look for an option within the plugin settings to reset or clear CSS cache.
Regenerate Files:
Next, regenerate the plugin’s files to ensure they’re up-to-date and properly configured. This process can often resolve issues stemming from corrupted or outdated files. Look for a feature or option within the plugin settings to regenerate CSS or asset files.
How to Regenerate Elementor files?
1. Navigate to Elementor Tools: Hover over the “Elementor” menu option on the left-hand side of the dashboard. This should reveal a submenu.
2. Select Tools: From the Elementor submenu, click on “Tools.” This will take you to the Elementor Tools page.
3. Regenerate Files & Data: On the Elementor Tools page, locate the section titled “Regenerate Files & Data.” Within this section, you should find options to regenerate various elements.
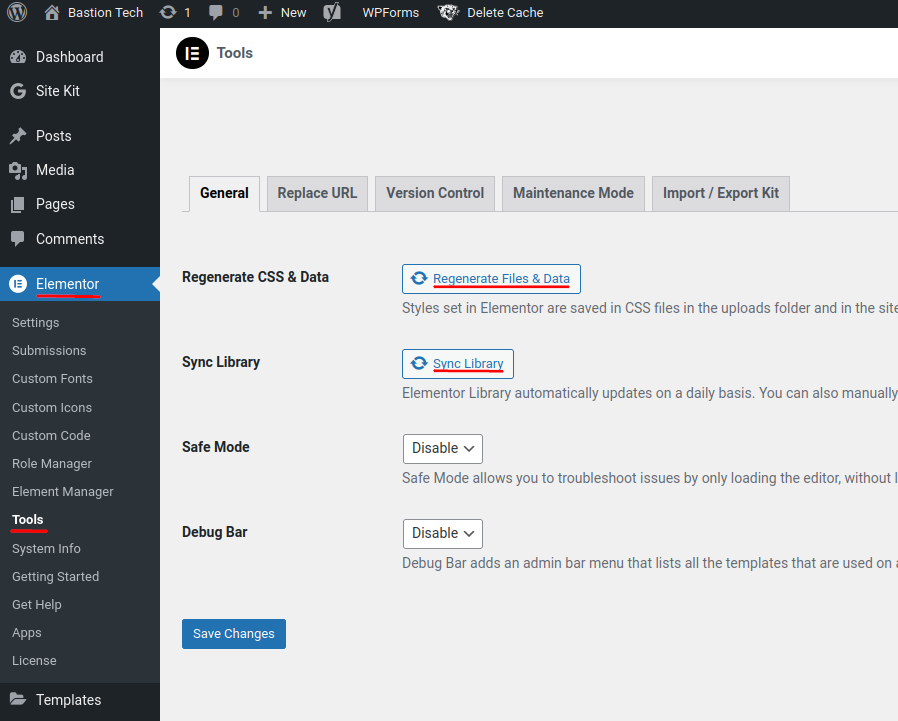
4. Click Regenerate: Look for the option to regenerate files and click on it. This action will prompt Elementor to regenerate its files and associated data.
5. Resync Libraries: Additionally, you may find an option to “Resync Libraries” in the same section. Click on this option to ensure that Elementor’s libraries are synchronised and up to date.
WordPress Theme Causing Bugs
Although themes do give a great foundation and structure to your site I always try to opt for not using them. Updates to themes can inadvertently alter styles or remove custom CSS and functions you’ve painstakingly added.
If updates to a theme have removed your custom code or accidentally broken something on your site there isn’t much you can do apart from restore the site to a backup. If you want to avoid this in the future you need a child theme.
How to Make WordPress Child Theme to Stop CSS Breaking?
If you haven’t already, install and activate the WP File Manager plugin on your WordPress site. It’s a small plugin but is essential to access all your wordpress files.
You can do this by navigating to the Plugins section in your WordPress admin dashboard, clicking on “Add New,” and searching for “WP File Manager.” Once found, click “Install Now” and then “Activate.”
1. Access WP File Manager: After activation, locate WP File Manager in your WordPress admin dashboard. It’s typically found in the sidebar menu under “File Manager.”
2. Navigate to Themes Directory: In WP File Manager, navigate to the themes directory of your WordPress installation. This is usually located in the wp-content folder.
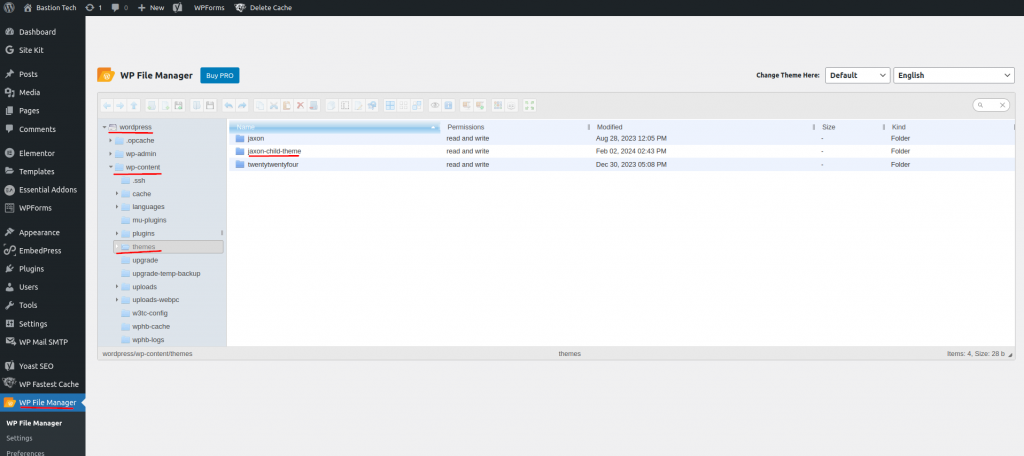
3. Create Child Theme Folder: Within the themes directory, create a new folder for your child theme. Name it something unique, like “my-child-theme.”
4. Create Stylesheet: Inside your child theme folder, create a new file named “style.css.” This file will contain the CSS styles for your child theme.
5. Add Theme Information: Open the style.css file and add the following information at the top:
					/*
Theme Name: My Child Theme
Template: parent-theme-folder-name
Version: 1.0
Description: Child theme for Parent Theme
Author: Your Name
Author URI: Your Website URL
*/

/* Your custom CSS styles go here */
Replace “My Child Theme” with the name of your child theme, “parent-theme-folder-name” with the folder name of your parent theme, and fill in the other details accordingly.
6. Save Changes: Save the style.css file.
7. Activate Child Theme: Once you’ve created the child theme folder and style.css file, go to the Appearance > Themes section in your WordPress admin dashboard. You should see your child theme listed there. Activate it to start using your child theme.
8. That’s it! You’ve now got a child theme, any updates to your theme and your website and styles will be safe.
